
Allow me to introduce myself, I am Fiona, a Scot (hence the blog title!) currently living in Riga, Latvia. I enjoy trying my hands at different crafts but recently I have been drawn more and more to quilting, mainly due to the inspiring blogs, Bees and Quilt and Sew a Longs that I have found in blogland.

I first encountered patchwork and quilting when I signed up for an evening class several years ago in the UK. The aim of the class was to make a bed-size quilt using QAYG. It perhaps tells you something about the class that all but one of the blocks are completed and still waiting to be put together into a quilt. It is on my to-do list for this year though, well actually finishing the last block is, not finishing the quilt!
Discovering blogs and particularly craft blogs opened up a whole new world for me, and suddenly I was encouraged to have another go at quilting, which leads me to my first blogging tip - Join in! I started this blog in January this year, and simultaneously signed up for Sew Happy Geek's Sampler QAL, it was not only a great introduction to quilting, but also to other bloggers. The quilt from the QAL is in the middle of the second row in the mosaic above. Since then I have learnt to paper piece with Katy, which resulted in the Circle of Geese and Log Cabin cushions above, and embraced Zakka-style in the SAL, hence the tote bag and mug rugs above too!
The mosaic itself is my second blogging tip - Big Huge Labs If you have been wondering how to put together a mosaic of all your projects, wonder no more! Access to the mosaic maker is free once you have registered and you can link your account to Flickr and Facebook accounts too.
As to quilting tips I can only repeat the join in tip, as I would definitely never have attempted paper-piecing without the support and inspiration of fellow bloggers.
My favourite quilting tool has to be my 6.5" and 12.5" rulers, the first is invaluable for trimming a 1/4" seam from paper-pieced patches and the second for squaring up blocks in the various BOM's I have joined.
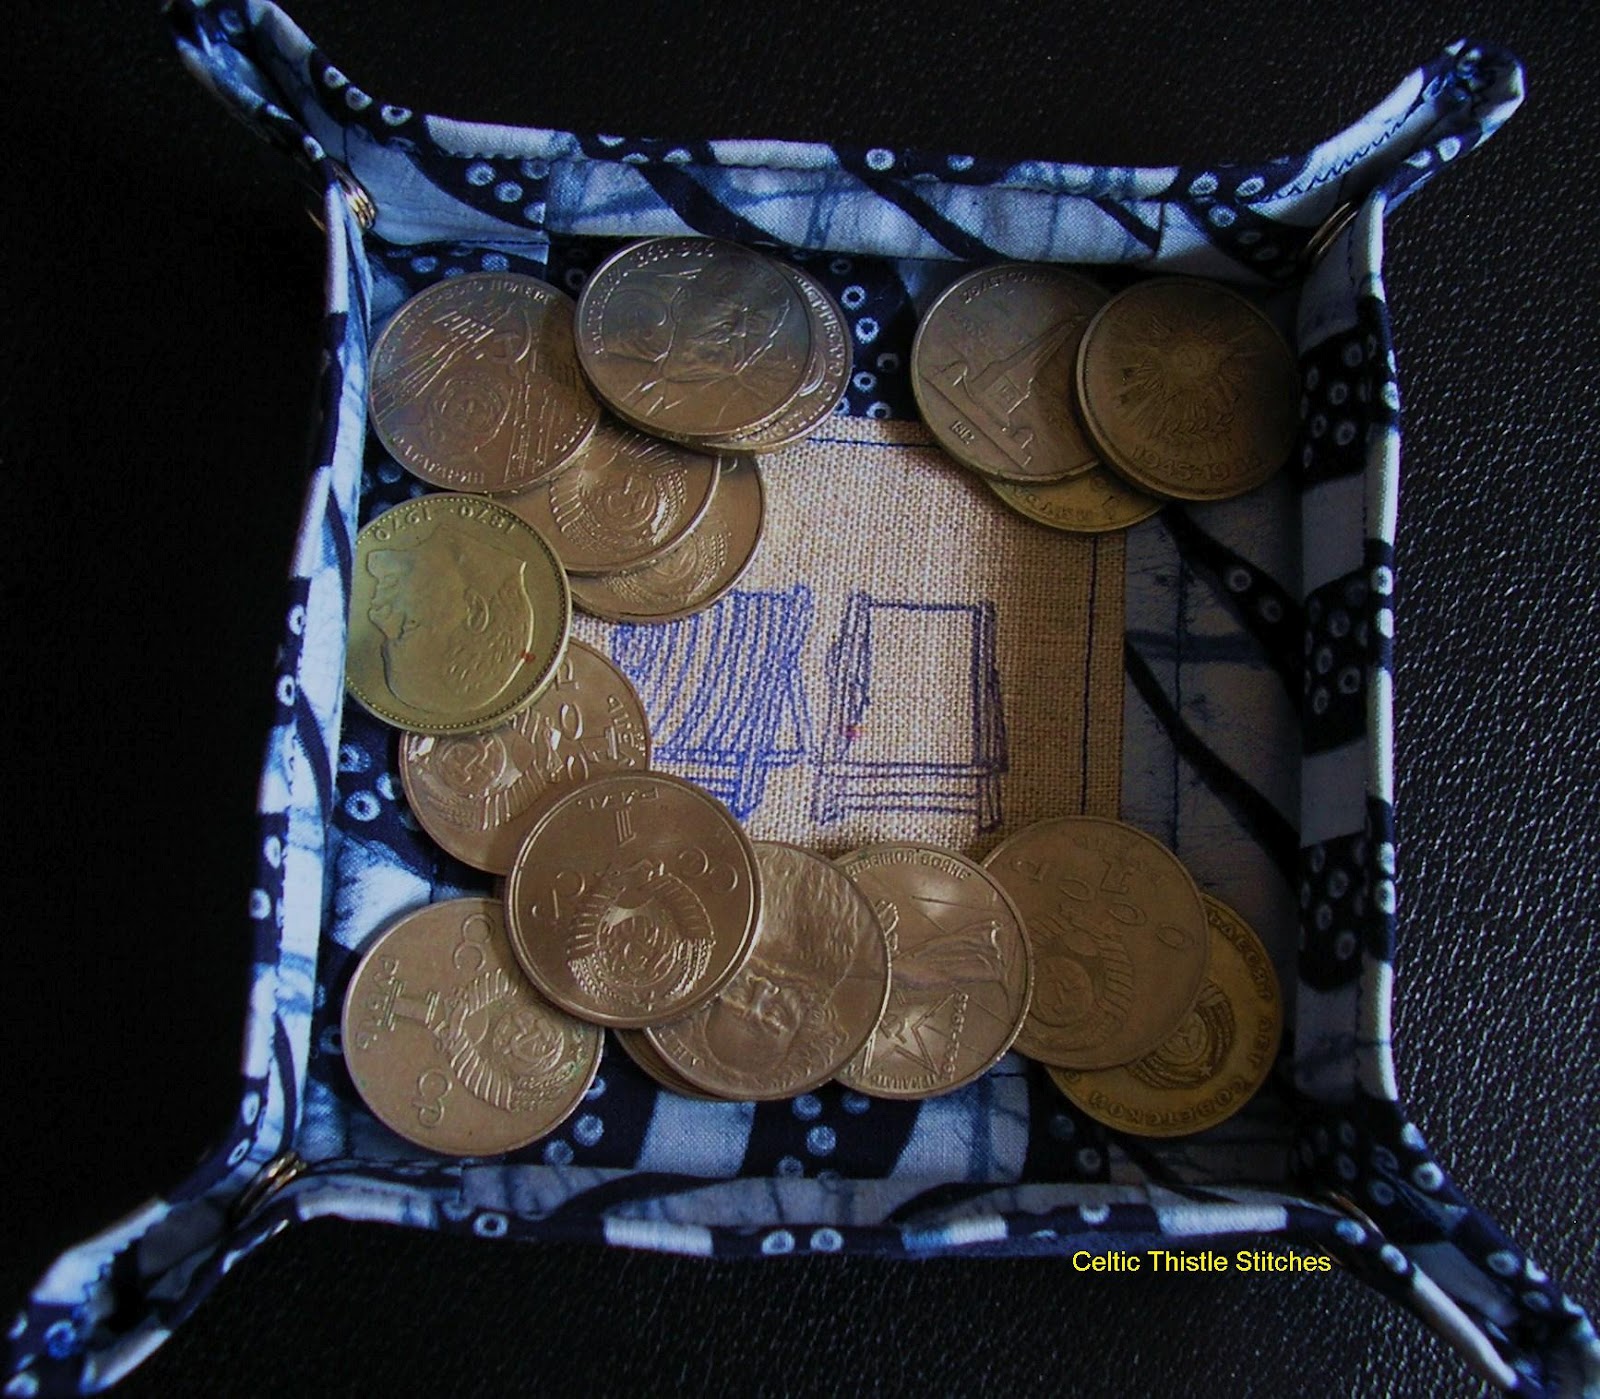
Either of these tools will come in handy for the tutorial I have put together for today's post. As regular readers will know, since living here in Riga we have taken every opportunity to travel around the region, so travel accessories are high on my list of useful projects. The project today, though, was inspired by a remark from our eldest son about wanting a leather travel coin tidy. Well, I thought why buy a soulless leather tray, when I could put together a more personal tray for him, so here it is.

 The fabric is Box Cars purple by Echino and is available from the Eternal Maker
 Travel Coin/Key Tidy Tutorial
To make a Travel Coin/Key Tidy you will need the following;

Feature fabric - 1FQ (more if you use a directional fabric like the Box Cars)
Natural Linen - 6" x 6" square
Wadding - 10" x 10"
Heavy Sew-in Interlining 6" x 6" (I used Vilene Craft/Pelmet Sew-In)
4 10mm Press Fasteners/Studs (+ Press Stud Pliers if you have them)
Letter Stamps + Stamp Block
Ink Pad for fabric (Versamark and Stayzon inks are both recommended for fabric)
Cutting Instructions
From the natural linen cut one 4" x 4" square
From the feature fabric cut two 4" x 3" strips, two 9" x 3" strips, one square 10" x 10" and sufficient 1.5" strips to make at least 40" for binding
Step 1 : Stamping the Linen Centre
Protect your work surface with wastepaper. Arrange your letter stamps on the stamp block to spell out your chosen words or phrase. They will be reversed on the block. Ink the stamps with your chosen colours. Be reasonably generous with the ink as the linen fabric is fairly absorbent. If you are too generous you can clear up any excess ink on the stamps with a baby wipe!
Once you have stamped your fabric you will need to set it with a hot iron. (I used Versamark ink, check the manufacturer's instructions if you are using Stayzon inks)

Step 2 : Making the tray inner
Using 1/4" seams throughout attach the 4" x 3" strips of feature fabric to the 2 sides of the stamped linen square. When sewing with linen I usually stitch a second line of stitching inside the original seam allowance to help prevent fraying, but I err on the side of caution after a shop-bought linen log-cabin cushion cover came apart in the first wash!
Press seams to the side and attach the two 9" x 3" strips to the top and bottom of the linen square

Cut your heavy sew-in interlining to 5.5" square and baste to the centre of your pieced tray inner. Layer up your backing fabric, wadding and basted tray inner and baste all of the layers together. You will need to quilt straight lines 1.5" from each side of the pieced square, the length of each side. These lines will cross in each corner creating a ready-made guide for your press studs/fasteners later on. The remainder of the quilting of the tray is entirely up to you, make sure though that you quilt the heavy sew-in interlining as this will create the flat bottom for the tray. I chose to quilt around the stamped square and echo quilt around the square, but left the centre unquilted.

Trim the excess wadding and backing.
Step 4 : Binding
Sew your 1.5" strips together at right-angles to each other to make one continuous strip for binding. Fold the strip in half lengthways and press along the fold. I prefer to attach my binding to the front of the square by machine using a 1/4" seam and mitring the corners then folding over to attach by hand to the back, but you may prefer to machine stitch the binding completely. In which case, you will attach the binding by machine to the back off the quilted square and then fold over and attach to the front by stitching in the ditch through all layers.
Step 5 : Attaching the press fasteners
To make the quilted square into a tray that will fold flat for travel, you will need to add 4 press fasteners/studs, 1 to each corner.
Using the quilted lines you sewed earlier mark the halfway point on both sides of the corner. This is where you will fasten the studs. Each stud is comprised of 4 parts, two rings with hooks and 1 male and 1 female fastener.

You will attach a hook ring on the exterior of the tray and 1 male fastener on the inner tray at the first mark and another hook ring and 1 female fastener on the opposite mark on the corner. The fasteners come supplied with a tool for fixing them to the fabric, which needs a hammer to exert the pressure needed to lock the hooks in the male and female fasteners. Alternatively, you can use eyelet/stud pliers.


Place the quilted tray between the two arms of the pliers or tool at the mark you made earlier and squeeze tightly together or hammer to lock the fastener in the tray.


When you have attached each of the press fasteners, press them together and voila! You have a travel coin/key tidy!

I hope you have fun using this tutorial and thank you for making it this far!
Don't forget to check out my fellow Blog Hopper Colby's sewing machine cover tutorial today too, and if you have missed them you can catch up on all the other posts in the Blog Hop here. On Thursday the Blog Hoppers will be :
Mary from Spoolhardy Girl
Fiona from Finding Fifth
Finally, huge thanks to Beth who is responsible for organising the Blog Hop, she has put in a tremendous amount of work to put together such a wonderful array of bloggers. There is no shortage of inspiration and talent on display, and the Blog Hop certainly demonstrates all that attracted me to blogging in the first place, so it is a real privilege and pleasure to be able to take part.
I look forward to seeing travel tidies popping up in blogland soon and to meeting new readers as a result of this post.

Lol, love your key tray, and any time you need me to lead you astray, just let me know ;o)
ReplyDeleteAh, snaps! I have a love-hate relationship with my snap pliers. There are so many other things I would like to use them, but I tend to avoid them because it is so difficult to get the durn things to line up "just so."
ReplyDeleteLove the travel tidy - such a great idea! I particularly love that you used the Echino car fabric - so cute!
ReplyDeleteEnjoyed reading your post, as always! :)
What a fabulous idea, Fiona! I agree totally re your comments on 'joining' in. I lurked around for ages before I finally made the jump and joined in.... then wondered why I hadn't done it sooner. It opened up a whole new world, which I love.
ReplyDeleteLove this project :) And I think it looks great in the Echino fabric!
ReplyDeleteSo cute! I've never installed snaps before but now I really want to :)
ReplyDeleteThis is super cute! I haven't given the snaps a try, but I have been having fun with my grommet tool lately! I loved your mosaic of projects, too. Nice to see your Ace of Diamonds mini again :-D
ReplyDeleteLove this, Fiona! Such a great idea and a cute way to do it!
ReplyDeleteWhat a very cute idea and a great tutorial!
ReplyDeleteAwesome idea - I will have to try this!!! Great to get to know you more too!!! Love the stamped words :)
ReplyDeleteThat's such a great idea and your tutorial is brilliant and so clear. I know someone who needs one right away:-) It was nice to read more about you!
ReplyDeleteNice to meet you! Thanks for the tip on the mosaic. i'll go chack it out.
ReplyDeleteGreat tutorial, that would be a fantastic present for man. I find it quite tricky to find male homemade present ideas!!
ReplyDeleteThat tool looks quite a scary piece of kit!!
Fiona, that is a great tutorial. Might have to make one for my husband, although I'm not sure one would hold all of his keys! Thanks for this!
ReplyDeleteoooh, what a great idea to use snaps to hold the corners together, I've only made them with ties before. But I have to ask - I have that very same snap setter thing and I just can't use it! Please tell me how! yes, I know you did that in the tutorial, but I put my eyelet things in the holder and they just fall out!
ReplyDeleteVery clever project - nice! And I love how you've joined in! What great tips you shared too. Nice!
ReplyDeleteNifty & handy project. Nice to see something that works for the guys in our lives!
ReplyDeleteGreat tutorial Fiona! I love useful and beautiful items like this :)thank you for sharing!
ReplyDeleteHi Fiona, nice to meet you. This a great tutorial and very useful. I'd like to make one for my sewing room to hold small tools.
ReplyDeleteThis project is so fun, Fiona! My boyfriend DESPERATELY needs this in his life :)
ReplyDeleteGreat tutorial, very useful indeed am going to put one on my to do list.
ReplyDeleteI popped over here on the Blog Hop and then realised that I hadn't *Followed* you yet... but now I have :D
ReplyDeleteI would really like to buy a fabric stamp pad. Where do you get yours from? All my local craft shops do not have anything like this.
xxxx
Cute!!!!!
ReplyDeleteWhat an adorable tutorial!! I need to make a bunch of these and put them all around the house for the random little bits that land everywhere!
ReplyDeleteYour mosaic is great and I love your tutorial. I think a leather change tray would be very boring after seeing this! Thanks also for describing the stamping process. I've never tried it but I love the idea of customising with print :)
ReplyDeleteMeeting people from all around the world and seeing their work is what is so wonderful about blogs. It's very nice to meet you Fiona. I love your name. So funny that you mention making mosaics because I just asked Colby from the other blogger today how she did it. Now I know where to go. Thanks.
ReplyDeleteSo lovely to meet you Fiona! And the fabric tray is such a great idea as I am always misplacing my keys!
ReplyDeleteFiona, I love your key holder! I am definitely going to make one for Elder Son, who recently got his own apartment. And I looked up Riga -- how did you wind up so far from home? My family clan is McPherson, but only the Younger Son is into things Scottish. He has a McPherson hunting plaid kilt, and many pair of kilt hose hand-knit by his Mama.
ReplyDeleteWhat a cute little tray! It was nice meeting you, Fiona!
ReplyDeleteLovely tutorial Fiona! It's a really neat idea with the snaps, I couldn't tell from the pictures before I saw the technique. And thanks for the tip for the mosaic maker, I was about to email Beth to request a tutorial on that one since I didn't know how to do it. Now I bookmarked the suggested page and will try it tonight! I was stopping by from the blog hop! :)
ReplyDeleteSo cute! Love the stamped middle for whatever little message you want to put in! Thanks for a great tutorial!
ReplyDeletenice tutorial!
ReplyDeleteOh Fiona - great advice above and a very Zakka-Style tutorial. I have not used fasteners before but I may do that now.
ReplyDeleteWhat a darling box for car keys. Nice getting to know you from the blog hop.
ReplyDeleteLove this - I definitely need to make several! Clever idea! Great to learn more about you, though, I must have been following your early blog days since I recognize most of the projects in your mosaic!
ReplyDeleteThis is such a cool idea! My husband leaves random little stuff EVERYWHERE and I have been looking for an excuse to buy stud pliers. so I think this project is going to solve all my problems :D
ReplyDeleteGreat tutorial and love the tray idea - so practical to have these around the house! Thanks for sharing! =)
ReplyDeleteBrilliant tray tutorial, love it! Great to catch up again :)
ReplyDeleteStopping by on the blog hop - hello!
ReplyDeleteLove your project, would make great gifts, however, I had just finished a wonderful safari type blouse which called for snass. I hate to say that the pliers worked for one ONLY and ruined that wonderful project of mine that sits in a closet full of holes!!!
ReplyDeleteOh dear, that doesn't sound good. I have had problems with snaps in the past when they have been too small for the pliers, so now I am careful to make sure I use the right size for the pliers I have.
DeleteSorry to be late for the party, but thanks for a great post. It's lovely to get to know you more, and the tidy is a great idea, I think that we need about 8 of these round the house, we're forever losing keys!
ReplyDeleteThis is seriously AWESOME!!! Great tutorial and I can't wait to try this one out :) Thanks girl
ReplyDeleteHow do I get my Wordpress blogs to get views in the days once i first
ReplyDeletepost them?
My webpage; vaginal mesh lawsuits
I bought some of this print ages ago but couldn't remember who inspired me so left it in the stash. Then I saw your post on the Name Game and realised it was your original post! Thanks Fiona, I might now have a chance of starting it!
ReplyDelete