Friday 25 November 2016

Old and New in New to Me

Welcome to November's New to Me Link Party, where we celebrate our attempts at new things, whether successful or not!


My New to Me's this month are a very mixed bag :)

I contributed a New round-up of tutorials for Gifts that are Easy to Ship for the Sew Mama Sew Handmade Holidays series. Check them out here if you haven't already, you may see some names in there that are familiar!

A new sponsor of the Ho, Ho, Ho Giveaway Prize.

Head on over to Karen at Practically Pippy to link up your Christmas makes this month to be in with a chance of winning the gorgeous bundle of FQ's from Lewis and Irene's Northern Lights collection generously donated by Justine. Check out Karen's great Quilted Christmas Wreath pillow too whilst you are there :)


Last month I visited an exhibition by the Ayrshire Quilters, one of whose quilts you can see above, and this month I joined the group for the first time. I was introduced to the group by Sheila, who blogs as Bluepatch Quilter. It was lovely to meet in real life someone that I have only encountered virtually before!

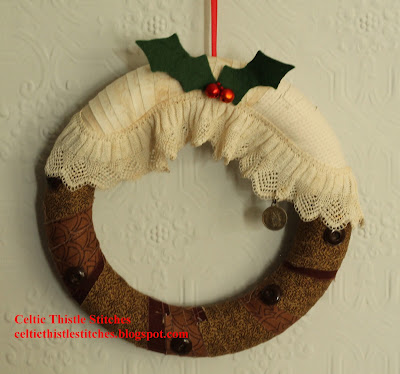
Another new tutorial added to the blog. This time it was for a Christmas Pudding Wreath, and I got the chance to incorporate some lovely vintage lace into a project for the first time too!


Definitely not vintage is my next New to Me! I suspect that I am not the only one who struggles with carrying all of the paraphernalia needed for a quilt class, so when I saw this handy portable ruler set on Massdrop I couldn't resist. I love my Karen Kay Buckley applique scissors so I am sure that this ruler will become one of my favourite tools. 

My final New to Me for the month is way out of my comfort zone :)


The deadline is looming for the handover of the charity quilts I and my fellow quilters are making in my Thursday patchwork class. I have had the quilt top finished for ages but hadn't made up my mind how to quilt it when I came across a magazine article on Tied Quilting. So I thought that I would give it a go. The quilt is backed with a check wool so with wadding it is quite thick and seemed to be an ideal candidate for my first attempt at Tied Quilting.
So far, I am enjoying it but will let you know if that is still the case by the time the top is quilted!

That's my New to Me's for November, now it is your turn to link up and celebrate the trying of something new. Of course it would be nice if our something New's were successful, but you are amongst friends here. We know that it isn't always the case so, hey, we are here to celebrate anyway the fact that we tried :)

As ever please help to spread the word by linking back to this post in your post and/or adding the blog button to your sidebar.


Celtic Thistle Stitches


Check out the other links too and, maybe, leave an encouraging comment along the way. The emphasis of this link party is to celebrate the trying so a little encouragement here and there would not go amiss! 
The link will remain open until 23.59GMT on November 30th, so you have some time yet to try something new and link up and join the party :)



Friday 18 November 2016

Christmas Pudding Wreath

I promised you a tutorial for my Christmas Pudding Wreath and here it is!

It really is a speedy make and one that a child could make with minimal supervision, so if you need a little 'me' time you know what to do :)

To make your own Christmas Pudding Wreath you will need the following :

  • One 8"/20cm polystyrene ring
  • Scraps of brown fabric approximately 2" wide equalling 120" in length
  • Scraps of cream fabric approximately 2" wide equalling 70" in length
  • 5/6 small brown flat back buttons
  • 10" scalloped lace trim
  • Scrap of green felt approx 3" square
  • 2 small red bells 
  • Small brass coin charm and 1 brass jump ring (optional)
  • 12" narrow red satin ribbon

You will also need pins/glue or staples to attach the fabric to the ring.

Step 1

Sew the brown fabrics together until you have a strip 2" wide and 120" long. (If your ring is bigger than 8" or your strips are narrower than 2" you will need to make the strip longer than 120" )

Starting at a point halfway between the top and left mid-point of the ring pin/glue or staple one end of the brown fabric strip to the back of the ring. Holding the fabric tightly in your hand wrap the ring with fabric overlapping the fabric approximately every 1/4" to 1/2" all the way around to the same point on the opposite side of the ring. (If you are left-handed it might be easier to start on the right hand side and work towards the left)

When you have reached the opposite point of the ring pin/glue/staple the fabric to the reverse of the ring. (If your fabric strip is too long just cut off the excess fabric at the back of the ring, the exact length of strip that you will need depends upon how tightly the ring is wrapped so you may end up with a little bit of extra fabric if your wrapping is not as tight as mine was).


Step 2

Sew the cream fabric scraps together until you have a strip 2" wide and 70" long.

Starting where you began with the brown fabric wrap the cream fabric around the ring overlapping the end of the brown fabric and then wrap in the opposite direction until you reach the other end of the brown fabric. Overlap the end of the brown fabric and wrap the cream fabric around a couple of times before finishing as before.


Step 3

Glue the buttons randomly on the brown fabric wrapped section of the ring.

Step 4

Attach the scalloped lace trim to the wreath starting at the back of the ring where the cream fabric wrapping begins and following the curve of the wreath finish at the back where the cream fabric wrapping ends.


Step 5

Cut out two holly leaf shapes from the green felt. (I cut my shapes out freehand but you could trace the pattern first on the felt) Overlap them at one end and stitch together. Stitch the bells to the felt leaves where they overlap. Glue/pin the holly leaves and bells to the centre top of the wreath.


Step 6

Fold the ribbon in half lengthwise and pin/staple to the centre top back of the wreath.

Attach the coin charm to the edge of the lace using the jump ring.

Stand back and admire your new Christmas decoration :)


More Pudding? - Ho, Ho, Ho and on We Sew

It is getting closer! This time next month we will be one week away from the Big Day, so if you haven't already started your Christmas crafting then it really is time to start! Of course, help is at hand with another Ho, Ho, Ho and on We Sew Link Party.


If you need some inspiration for your festive crafting, each month we add a brand-new Christmas or Holiday project to the Ho, Ho, Ho and on We Sew archive. Click on the button at the top of the page to see all of the brilliant projects dreamt up to date by our fabulously talented guest hosts and be inspired!

This month's guest host is the very talented Karen, who blogs at Practically Pippy, so you know that you are in for a treat!

As ever, we have a great giveaway prize for one lucky linker and this month's prize couldn't be more appropriate. Courtesy of the lovely Justine at Simply Solids, we have a FQ bundle of the gorgeous Northern Lights collection by Lewis & Irene, five FQ's of frosty goodness to add to your stash!

To be in with a chance of winning all you have to do is  link up your Festive makes to this month's Link Party to be entered into the draw. Keep it current though no blasts from the past here! The Link Party is open until 23.59 GMT on November 30th so you have plenty of time to get stitching :)

The winner of last month's festive thread collection was Sandra, who managed to add a collection of Eunice bags to her burgeoning stash of handmade gifts.

I still have food on my mind for this month's Christmas crafting! Last month's Christmas Pudding Teatowel tutorial got me thinking, and after a rummage around the boxes that are currently passing for storage in my new sewing room I came up with this.

A Christmas Pudding Wreath complete with lucky coin!

The lace on this wreath was in a box of vintage lace from my mum, who was told by the lady who gave it to her that the lace is Honiton Lace made for Queen Victoria! I did feel a bit guilty using it on a scrap project but then decided that it was better used than lurking in a box!

I have written up a tutorial for the wreath which you can find here in case you would like to make one too :)

So, that's my Ho, Ho, Ho and on We Sew project for November, now it is your turn to get crafting and linking over at Practically Pippy and be in with a chance of winning that lovely FQ bundle.

Linking up to Crazy Mom Quilts

Tuesday 15 November 2016

Gifts to Go

If, like me, you need to send some of your Christmas Gifts by post then you will know how hard it is to find suitable gifts to send that won't break the bank when you get to the head of that Post Office queue.

Help is at hand!

Head on over to Sew Mama Sew today to find my round-up of great handmade gift tutorials that recipients will love and won't cost an arm and a leg in postage. Win-win :)

Related Posts Plugin for WordPress, Blogger...