Thursday 28 November 2013

Black Tie Boogie - Blog Hop

Welcome to my stop on the Blog Hop, and Happy Thanksgiving if you are reading this in the US.

If you are new here welcome, take your time and have a look around I am delighted to have you visit my little corner of blogland.

As ever, thanks to Madame Samm, the Blog Hop supremo and Vickie, our very patient cheerleader, we would have been lost without you!

Here are the other creative Blog Hoppers sharing their projects today. 

November 28


When Madame Samm announced that the subject of this Blog Hop was Roosters, well I was hooked! It was only when I started planning my project for this Blog Hop that I realised just quite how many Roosters I have around the house :)


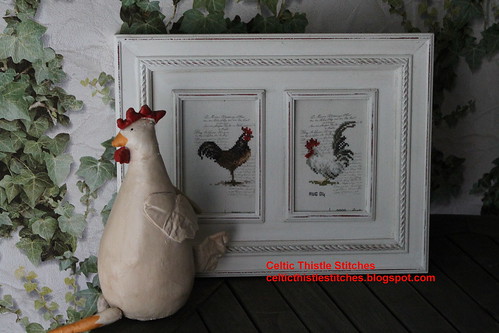
There are cross-stitched Roosters,

Rooster cross stitch


stuffed and painted Roosters

Rooster box


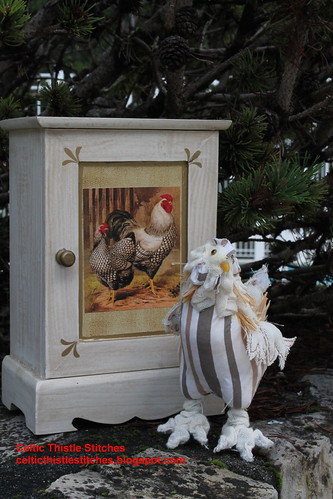
more painted Roosters and a quilted Rooster!

Rooster quilted cushion


The quilted Rooster cushion was my first ever attempt at hand-quilting and was completed as part of an evening class in Patchwork and Quilting that I went to about 7 years ago. I am delighted to see that my tentative hand quilting has stood the test of time (so far, anyway!).

After tossing ideas back and forth, always the hardest bit of the Blog Hop as far as I am concerned. I eventually decided to make another Rooster cushion. This time, however, I wanted to try something a bit different.

Rooster cushion front

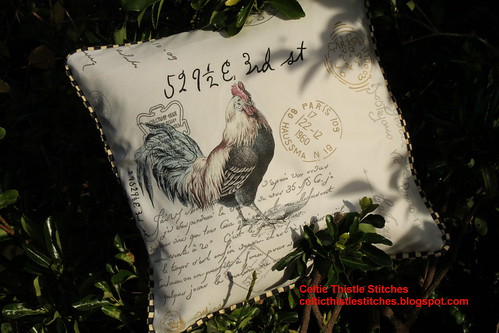
And here he is, my latest Rooster cushion!

The main cushion fabric is called Postcard and was another fabric from the lovely people at Terry's Fabrics

I downloaded the Rooster image from the Graphics Fairy website. If you haven't come across the website it is definitely worth a look, there are over 4,000 free vintage images available for download, as well as lots of hints and tips on how to use the images in crafting. It is a real treasure trove.

The original image was a bit too colourful for the background fabric, and for the effect I wanted to achieve,  so I toned down the colours before reversing the image and printing it out on Transfer Artist Paper. The printed image transferred perfectly to the Postcard fabric, and produced exactly the effect that I had hoped for, which definitely makes a pleasant change :)

Rooster cushion back


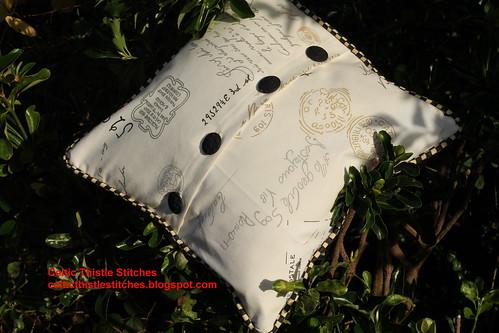
For the back I found a card of black embossed buttons bought at the haberdashery stall in a French market this summer. Some black and cream checkerboard fabric piping was the finishing touch.
 
I have enough of the background fabric left to make another cushion, so I might just be on the lookout for a hen image to give my Rooster some female company :)

Thanks for dropping by today it has been nice to "meet" you.


Sew Many Ways

Wednesday 27 November 2013

Making Christmas - Week 7

Aren't the weeks flying past at the minute, or is that just me? Anyhow it is about time that I had a look to see how much, if any, progress I have made on my Christmas list.

MAKING CHRISTMAS 2013

Sadly not very much progress has been made, although thanks to a fortuitous win and some happy mail, there is potential for more progress soon!

I was lucky enough to win a $50 gift voucher from the Sew Sisters fabric shop in the OctoberQuest2 prize draw. It may be down to the fact that they are based in Canada, but they had the perfect fabric for the pyjama trousers that I am planning to make for my youngest son.


He has a moose sticker on the back of his car, which makes it very easy to find in the car park, and loves everything moose-related so it must have taken me all of 5 minutes to spend the voucher. I have no idea how the Wishes charm pack managed to "fall" into the basket too :)

Said son will be away this weekend, so I am planning on tackling the pyjamas whilst he is gone. Having never sewn clothes before, I am keeping everything crossed that it all works out as planned!

I have also pulled the fabric for the BBQ apron and oven mitt, so will, hopefully, get started on these soon too.


These need to be posted for Christmas, so I really would like to get them done and dusted and in the post before the Christmas rush. One memorable year our parcel to them didn't arrive until January, and even then had completely different presents inside, so I have been very wary of sending parcels late in December ever since!
 

So here is how my list is looking now
  • A Christmas Table Runner for our new dining table MADE
  • Two Pleated Pouches to fill with make-up/nail polishes for my daughter-in-law and daughter-in-law to be
  • Two One Liberty and linen jewellery roll for my sister-in-law
  • One Triple Zip pouch for my sister-in-law MADE
  • A Knotwork Christmas cushion - for me!
  • A Fairytale Cushion for my grandniece using one of Quiet Play's Happily Ever After paper-pieced patterns
  • Homemade chutney for my brother and son MADE
  • Homemade relish for my brother MADE
  • More dishwasher vodka!
  • Biscuits for cheese for my brother 
  • Meat rub, BBQ apron and oven glove for my b-in-law - fabric pulled!
  • Pyjama trousers for my youngest son - fabric received!
I hope you have been making more progress than I have, and if you are stuck for a quick gift check out Nat's great tutorial on turning a knitted jumper into a cross-stitch cushion, it is genius :)


Link up your Making Christmas progress this week and check out everyone else's progress (or lack of!) with Nat at Made in Home 


The link up for November's New to Me is open until November 30th, so if you have tried something new this month link it up here


Linking up to 

WIP Wednesday at Freshly Pieced


Tuesday 26 November 2013

Happy Mail

There has been some decidely happy mail heading my way recently.

First up was this lovely block from Nicky, for the Star of Africa Bee.


I asked my Bee Mates to make a block on the theme of houses, and Nicky came up with this wonderful representation of Eilean Donan Castle for me. Didn't she do a fantastic job on this block? The Castle sits at a point in Scotland where three sea lochs meet, and I think Nicky has captured the iconic image so well. The Celtic Knotwork pincushion was an added treat! Thanks Nicky.

I have at least one more block to make for the Star of Africa Bee and this has spurred me on to knuckle down and get the block done, hopefully, before the year ends.

Another happy parcel arrived this morning and unlike the Bee block, this one was a complete surprise!


Now isn't that a nice package to receive out of the blue!

Ages ago I posted about this seagull cushion that I had made for a Blog Hop.


Seagull cushion cover

In the comments, Pam at Threading My Way mentioned that her relative would love a cushion like this, so when I discovered that I had accidentally bought the cushion pattern twice, well it made perfect sense to send the spare copy to Pam.

I thought no more about it, until the package arrived this morning with a note from Pam telling me that she hoped to have finished her cushion by the time the package arrived!

Thanks Pam, the Australian soap smells gorgeous and the sewing-themed fabric will be perfect for a project for my (almost) revamped sewing room :)

I have also had some happy e-mail too, when I was the lucky winner of the Giant Chevron quilt pattern by the Elven Garden, in Jen's recent giveaway. Jen made a wonderful red, white and blue solid version of the Giant Chevron quilt, and Jess has some beautiful versions of her pattern on her blog here This is, apparently, Jess's first pattern release and if this is anything to go by she is definitely one to watch :)

Hope you are getting more than just bills through the post too!


If you are looking for the November New to Me link up you will find it here


Linking up to

Fresh Poppy Design


Monday 25 November 2013

New to Me in November

It's the 25th of the month, which means that it is time for another look at all the wonderful new things that you have been trying out this month.


My New to Me activities this month have been a very mixed bag indeed.

At the beginning of the month our holiday to France involved the first New to Me, a new route across the Channel, or to be more precise, under the Channel.


Our first ever trip on the Channel Tunnel was a great success, no delays and time for some sewing too!
It was a bit strange driving in to what is effectively a rather large tin box on wheels, but given that gale force winds were being predicted for the Channel the weekend we travelled, we were very pleased not to be sailing on our usual ferry route :)

My second New to Me was part of the sewing you see above. I decided to try out a new method of transferring embroidery patterns for the embroidery blocks in my Home for the Holidays table runner. I have used transfer pencils and pens in the past, but have struggled with the pattern lines being too thick sometimes. I am not the most accurate embroiderer in the world so sometimes have trouble covering the lines entirely. The thought of having pattern lines that will disappear after the stitching was very attractive! So out came the Frixion pens bought on our last trip to France (they sell them in the local supermarket, very handy!) and away I went.


You can see where I marked window panes with the pens in the embroidery above. I changed the pattern slightly as I was stitching and didn't stitch the panes in the end, so I was a bit worried that I might have messed the whole thing up.

Thankfully though the lines all disappeared when ironed. Cue much relief :)

I have read that the lines can reappear when the temperature is very low, but if this Table Runner is in minus temperatures so that the lines reappear, I will have much bigger problems on my hands!

My final New to Me was much less successful :(

Technically speaking I tried this in October but on October 31st so I am counting it for November. I had read that you could substitute plastic containers for shrink plastic to make jewellery. The plastic needed to be a particular type, with a number 6 inside the triangle recycling symbol for the shrink process to work. For several weeks I scrutinised every plastic container that came my way, and eventually discovered that the only ones that fitted the bill were the containers that the liquid washing detergent capsules come in! So if you happened to see a woman acting strangely in the supermarket scrutinising the bottom of plastic containers before rejecting them, now you know what I was doing :)


The plan was to create some sugar skull earrings for Halloween, so I drew out my sugar skulls with permanent markers on the washing tub plastic and went to town on decorating them.


So far so good, but then this is what they looked like after being shrunk in the oven!


Shrunken true, but not exactly evenly :(

I thought that the problem might have been that I was shrinking them in a fan oven, so tried again in the ordinary oven but it didn't make much difference.

Ah, well back to the drawing board!!


So that's all my New to Me this month, now it's your turn to share what you have tried out for the first time in November.

Link up your New to Me posts below and share your triumphs and/or disasters.

As ever please help to spread the word by linking back to this post in your post and/or adding the blog button to your sidebar.


Check out the other links and leave a comment along the way. The emphasis of this link party is to celebrate the trying of something new, whether it works out exactly as planned or not, so a little encouragement here and there would not go amiss! 

The link will remain open until November 30th so if you haven't already tried something new you still have time :)


Friday 22 November 2013

Zipping down the list!

Whilst searching through the rather large blue bag that passes for my odds and ends storage at the minute, I came across the printed instructions for the Triple Zip pouch from Debbie at A Quilter's Table. As well as the instructions, there was also nearly all of the cut pieces and zips needed to make one pouch.

Well, as I have at least two pouches to make on my Making Christmas list, it seemed like the right time to finally finish what had been started many moons ago :)


Making Christmas Triple Zip

And here it is, the fabrics are all by Amy Butler from my stash so it was a very economical make!

I am filling the pouch with some mineral bronzing powder and the brush to apply it, which I hope she will love as much as I do. If you haven't come across Lily Lolo mineral cosmetics before, I cannot recommend them highly enough ( and I am not being paid to say that!). The products themselves are excellent, free of any parabens, perfumes or dyes, so great for sensitive skin and on top of that their customer service is second to none. My order was dispatched a couple of hours after I placed it and arrived in the post the next day!

As my Instagram readers will know, this pouch did not come together seamlessly. For reasons unknown to myself, I pulled all the zips closed before stitching up the side seams ready to turn the pouch the right way out. As many of you will no doubt know from similar experiences, that makes it well nigh impossible to turn the pouch out!!!

It took me at least an hour of fiddling with the zipper pull through all the layers of fabric to finally get it to budge along the teeth. Fortunately neither the zip nor the pouch were any the worse for the wear, which is more than could be said for me. A restorative glass of wine was an absolute necessity :)

Hoping to get more ticks on the list this weekend, although we have just come back from a trip to IKEA, which resulted in a car full of new furniture for my newly-decorated sewing room. I might have to negotiate indecipherable diagrams and innumerable screw sets, not to mention an irritable husband, just to get to the sewing machine!

Linking up to Finish it up Friday

MAKING CHRISTMAS 2013

Thursday 21 November 2013

Beware - noisy knitters!

I don't know about you but my perception of knitters is that they are generally quite well-mannered, easy-going type of people.

They do things like knit scarves for clocks in cold countries,


or decorate communal spaces with knitted flowers


Yarn bombing 2 Oxford

So when I read in the local news about "noisy knitters being evicted from a local library" I was a bit surprised to say the least. Not only were the knitters being accused of being noisy, they were also told that their knitting needles were considered "dangerous" to boot :)

Clearly these needle wielders were not your common or garden knitters though, as they were described as a group set up to " knit replica anatomical parts for trainee midwives" I have to confess my mind boggled at that one, and boggled even more to read that they have to date knitted 1,500 pairs of breasts and are currently knitting replica wombs! Way beyond my fledgling knitting skills that is for sure :)

Fortunately the tale has a happy ending as they found a new home, and are currently clacking away with their dangerous needles entirely unhindered by stuffed shirt officialdom :)


My daughter-in-law tells me that this is the beginnings of a lace scarf, but I think I will keep out of her way until it is finished just in case :)

Linking up to


Really Random

Saturday 16 November 2013

Making Christmas 2013 - Home for the Holidays Table Runner

Week 6 already, how did that happen?

MAKING CHRISTMAS 2013 

When Janine and Rebecca announced the Making Christmas Blog Hop, it seemed like my posting day was ages away but now, not only is it Week 6 but it is also my turn to post on the Blog Hop, so if you are new here welcome, feel free to stay a while and have a look around.

Making Christmas is all about encouraging and supporting each other to tick off on your list all of those crafty makes that might otherwise slip off the radar in the run-up to Christmas. In addition, along the way crafty Bloggers will share their projects and ideas that might just be the ideal gift or home decoration project that you have been looking for. You can check out the projects that have been blogged about already on the Making Christmas Pinterest board 

Until now my Christmas makes have all been edible as my sewing room was out of action being redecorated. Happily the room is now presentable again and I don't have to negotiate tins of paint or rolls of wallpaper to get to my stash.

My project today, however, is a Home Decoration project that has been on my to-do list for a long time. 


I am calling it my Home for the Holidays Table Runner. The embroidery patterns in the middle are by Jenny of Elefantz and are free to download from her pattern store on Craftsy. As well as these Wonky Houses patterns, Jenny has lots of other great embroidery patterns including her Shabby Roses BOM and, currently, an e-zine stuffed full of Christmas projects, so definitely worth checking out. 

This finish means that here's how my list currently looks

  • A Christmas Table Runner for our new dining table MADE
  • Two Pleated Pouches to fill with make-up/nail polishes for my daughter-in-law and daughter-in-law to be
  • Two Liberty and linen jewellery rolls for my sisters-in-law
  • A Knotwork Christmas cushion - for me!
  • A Fairytale Cushion for my grandniece using one of Quiet Play's Happily Ever After paper-pieced patterns
  • Homemade chutney for my brother and son MADE
  • Homemade relish for my brother MADE
  • More dishwasher vodka!
  • Biscuits for cheese for my brother
 To the above though, I have added 
  • Meat rub, BBQ apron and oven glove for my b-in-law
  • Pyjama trousers for my youngest son
One off the list, two added that isn't how it is supposed to work!! Hopefully your lists are healthier than mine, add them to the link at the end of the post to join in the fun :)

If a Table Runner is on your list of makes for this year, here's how to make your own Home for the Holidays Table Runner. 

You will need ;

  • Wonky Houses embroidery patterns from Elefantz's Pattern Store (there are 4 patterns available but I only needed 3 of them for this project)
  •  Plain evenweave fabric for the embroidered blocks at least 3 - 6" x 6" squares ( I used an old linen table napkin)
  • Interfacing to back the embroidered blocks
  • Embroidery floss
  • Transfer paper/pencil/Frixion pen
  • Embroidery hoop
  • Quilting cotton to cut 64 - 3" x 3" squares and 6 -  3 and3/8" x 3 and 3/8" squares. (I used 8 Layer Cake squares that I received in a Christmas Fabric swap ages ago!)
  •  Wadding/Batting - 18" x 45"
  • Backing Fabric     - 18" x 45"
  • Binding strip  - 104" x 2 and 1/4" 

Step 1 

Download the free embroidery patterns and use your preferred method to transfer the patterns to your plain fabric squares. (I used a Frixion pen to trace the pattern on to my linen, you can see the inked lines in the photo below. I also altered the patterns slightly to make them more seasonal!)

Step 2

Embroider the houses, adding embellishments if you like. (I added candles in the windows of one house, a wreath on the door of another and a wonky Christmas tree to the third, and lots of snow!)

 
 Fuse the interfacing to the back of each square and trim each to 5.5" square

Step 3

Cut your 3 and 3/8" squares in half diagonally to give you 12 Half-Square Triangles (HST's). 


Step 4

Stitch your 3" squares together as follows;

8 pairs
2 rows of 10 squares
2 rows of 12 squares

At each end of the 10 and 12 square rows add an HST. Make sure that you orientate them so that the 3 and 3/8" edge of the triangles are on the top for one of the 10 and 12 square rows and on the bottom for the other 10 and 12 square rows.

Add an HST to 4 of the pairs of 3" squares, again orientating 2 to have the 3 and 3/8" edge along the top and 2 to have the 3 and 3/8" edge along the bottom.


Step 5

Join 4 pairs of 3" squares together to make 2 4-patch blocks. Join 2 pairs of 3" squares to an HST to make 2 4-patch blocks with an HST point.


Step 6

Stitch an embroidered square to your 4-patch blocks in the following order;

  1. 4-patch block with HST point
  2. embroidered block
  3. 4-patch block
  4. embroidered block
  5. 4-patch block
  6. embroidered block
  7. 4-patch block with point
(I couldn't fit it all in the photo but there is a 4-patch block with points on the left-hand side, honest! )


Step 7

Stitch a 10 square row to a 12 square row lining up the points at each end. Stitch these double rows to your embroidered block strip, one above and one below.


Step 8

Layer and baste the backing fabric, wadding and quilt top. Quilt the table runner. (I outline quilted each horizontal and vertical seam using a white thread on the top and red thread in the bobbin.)

Step 9

Trim the excess batting and backing and bind with a double-sided binding using the 2.25" strips.


Place it on your table and enjoy!


At least my table will be well-dressed this Christmas even if nothing else is :)

Thanks Janine and Rebecca for providing just the push I needed to finally make the Christmas Table Runner I have promised myself for years :)

Now it is your turn to link up your Making Christmas progress!


Thursday 14 November 2013

Sewing under the Sea

Last week we took a new route for our trip to France and travelled through the Channel Tunnel.

With nothing to do or see for 30 minutes what else can a girl do but get out the sewing kit?


So where is the strangest place that you have sewn?

Linking up to Really Random Thursday.

Saturday 2 November 2013

Making Christmas - Week 4

Another week has whizzed by so it is time to check in with my progress (or lack of!) on my list of Christmas makes.

MAKING CHRISTMAS 2013 

As I knew my sewing room was going to be out of action for most of the week, I wasn't feeling too hopeful on the sewing projects I would like to complete in time for Christmas. I was absolutely right to be less than hopeful! 

Whilst I had no sewing space to hide away in, I did have a kitchen to play in so I pulled out the recipe books and torn out magazine pages to see what I could add to my list of makes this week. I was so pleased with last week's chutney that I thought I would add another preserve to the cheese lover's hamper for my brother.


Spiced Pear and Cranberry Relish

So here is the latest addition to the hamper!

This was even easier to make than the chutney, as basically I threw everything in a pot and let it simmer for 30 mins :)

The recipe is available here if you would like to give it a go.

So one item added to my list and immediately ticked off! Is that cheating ??

So here's the current list, hopefully, some of those sewing projects will see some progress in the coming week.
  • A Christmas Table Runner for our new dining table
  • Two Pleated Pouches to fill with make-up/nail polishes for my daughter-in-law and daughter-in-law to be
  • Two Liberty and linen jewellery rolls for my sisters-in-law
  • A Knotwork Christmas cushion - for me!
  • A Fairytale Cushion for my grandniece using one of Quiet Play's Happily Ever After paper-pieced patterns
  • Homemade chutney for my brother and son MADE
  • Homemade relish for my brother MADE
  • More dishwasher vodka!
  • Biscuits for cheese for my brother
If you haven't already come across the Making Christmas Blog Hop, it is the brainchild of Janine and Rebecca who came up with the wheeze of asking fellow bloggers to post a list of the crafty projects they would like to complete before Christmas and link them up.

Along the way there will be posts and tutorials on holiday-themed projects, this week's post is by M-R at Quilt Matters, pop on over and check out what she has lined up for this week.

You can also check out all the great projects being ticked off those lists at the Making Christmas  Pinterest board.

So if you haven't already made a list, I don't like to worry you but it is November, maybe it is time you started thinking about that crafty Christmas you thought you had plenty of time for in the summer! Link up your list here and enjoy the support and encouragement of your fellow bloggers, and maybe get some handy ideas along the way :)
 
Related Posts Plugin for WordPress, Blogger...